Whimsy Scribble

DIY & Projects

DIY Mask & Key Organizer

DIY & ProjectsMichela Mastellone-SchottmanComment
diymaskkey.jpg

My mom’s birthday was last month and it seemed like a good opportunity to throw together a project I’ve been thinking about for a little while - a mask organizer! With masks being a daily necessity now, I’ve been finding them hanging around the house everywhere yet am still always scrambling around looking for a clean one. I imagine I cant be alone in this new annoyance.

20200817_095850.jpg

This project came together so well and was so easy that since creating the original for my mom’s birthday, I have made 2 more for my friend and I. Use whatever scrap piece of wood you have laying around. I started off by using leftover paint from house projects to put down a base coat. Once that was dry, I decided to use a toothbrush to splatter paint the background. Originally I did this to correspond with my parent’s front hallway that has remained unchanged from when I was given free reign to splatter paint it as a child, but the result was so great I repeated it for the other ones I made as well.

20200905_152720.jpg
20200816_200004.jpg

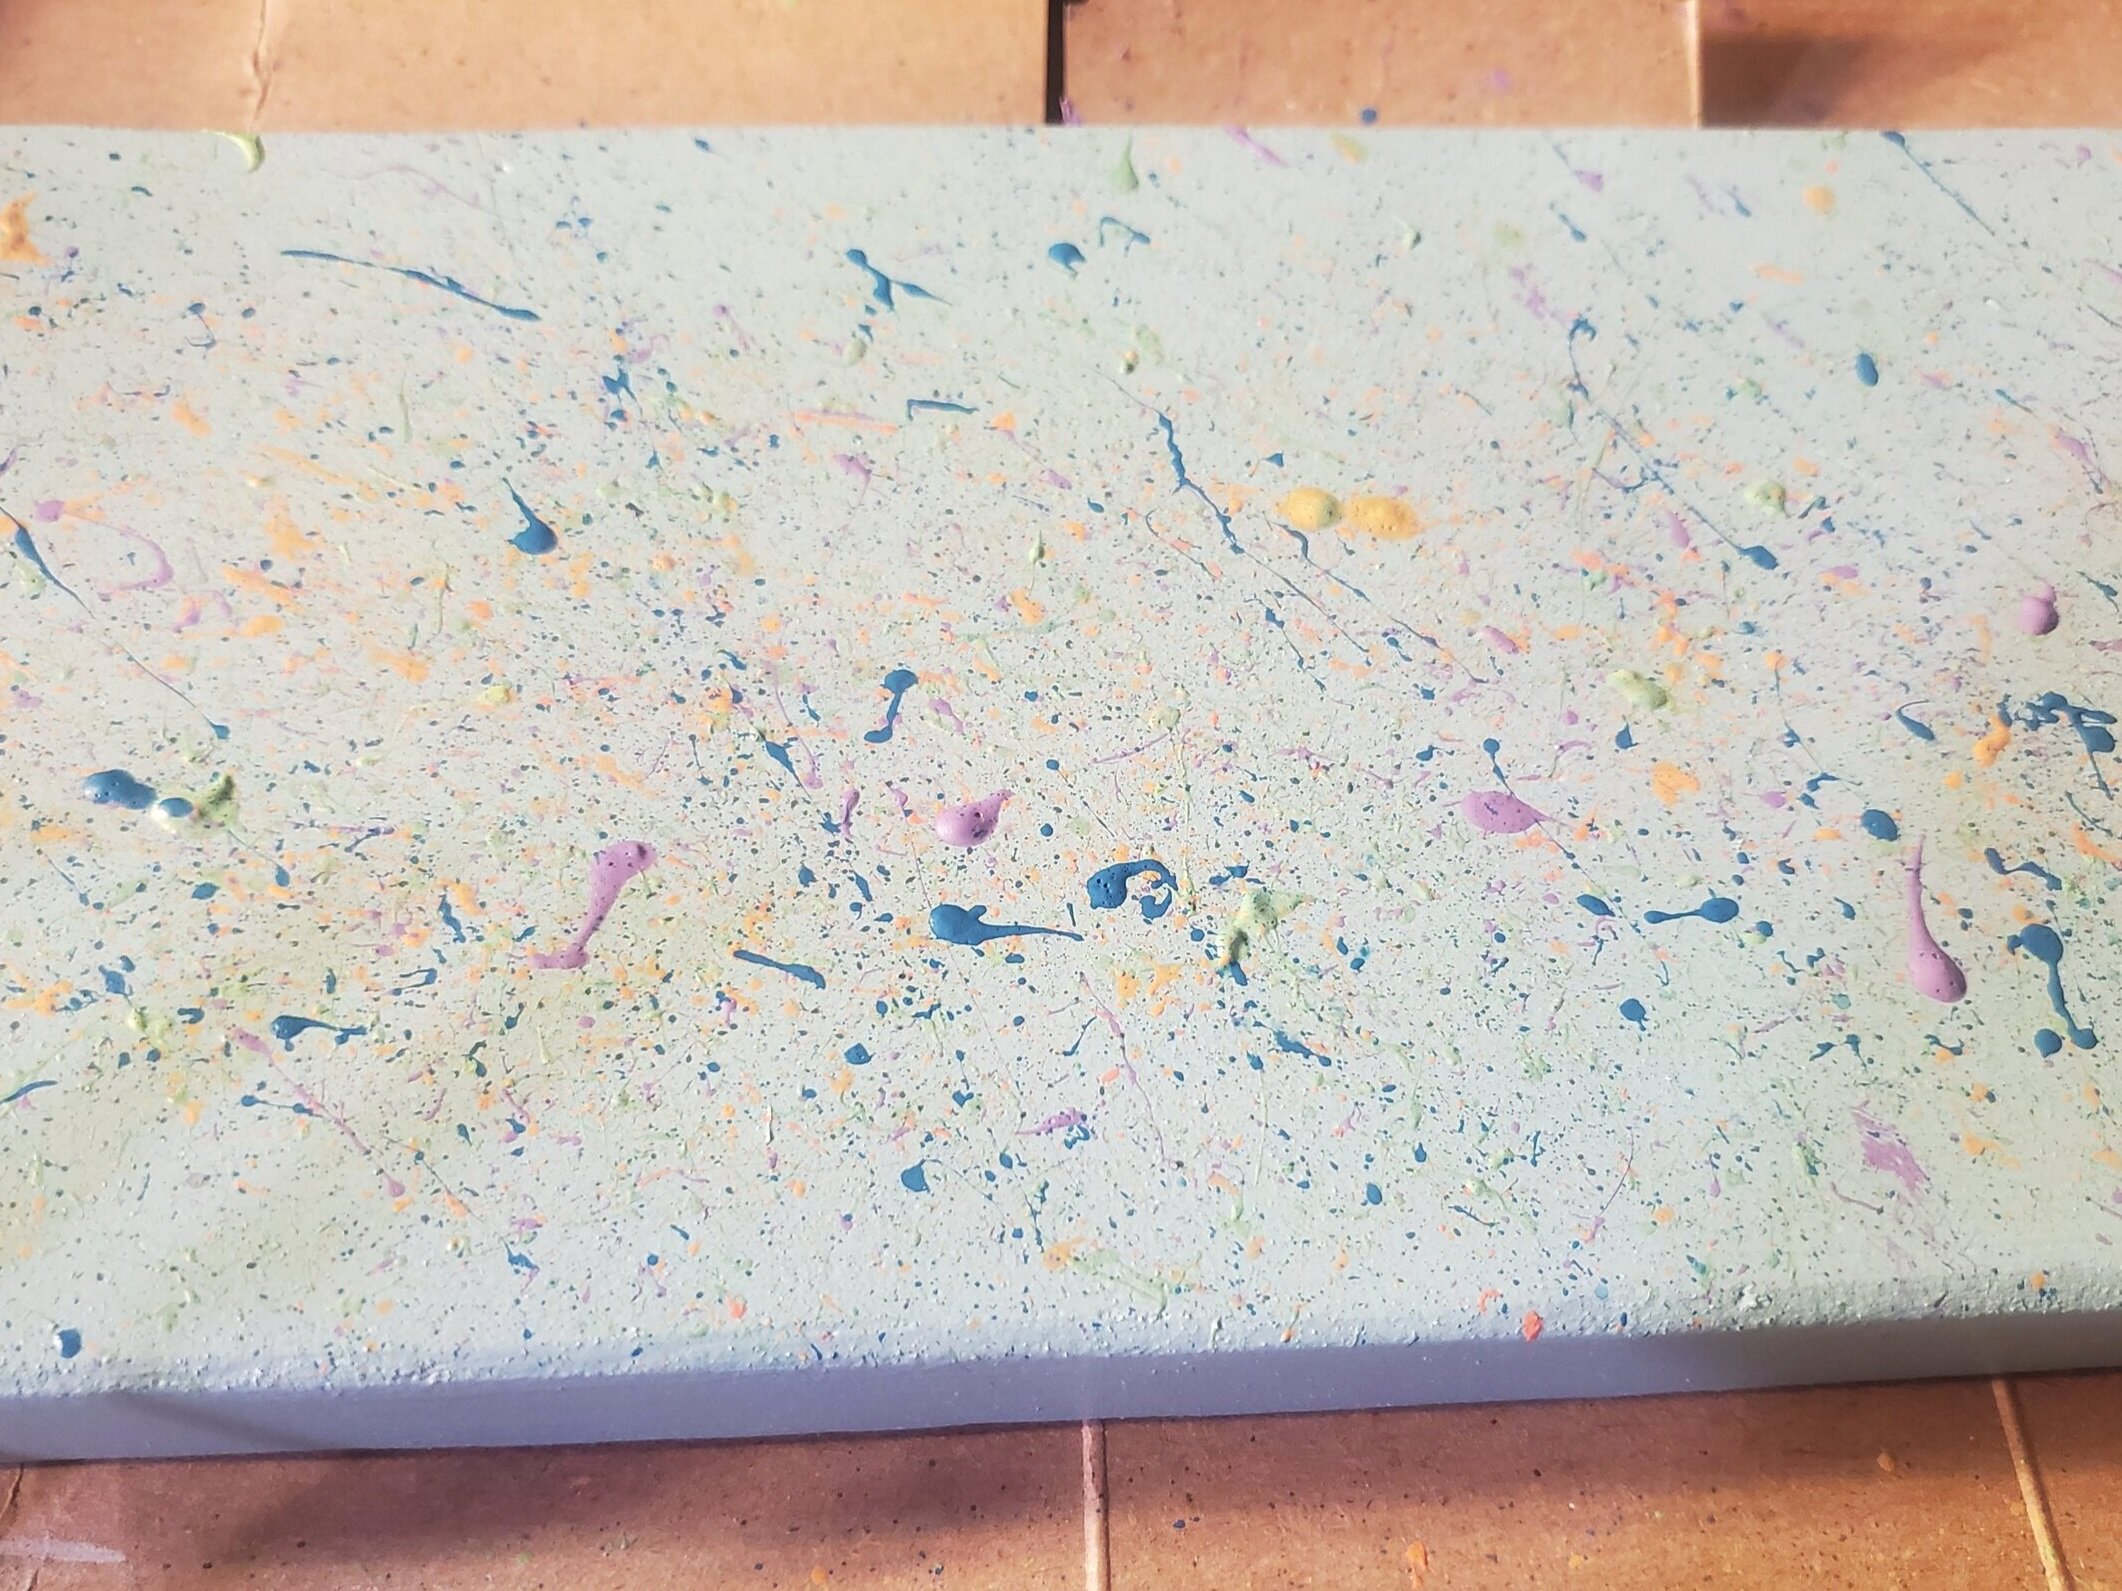
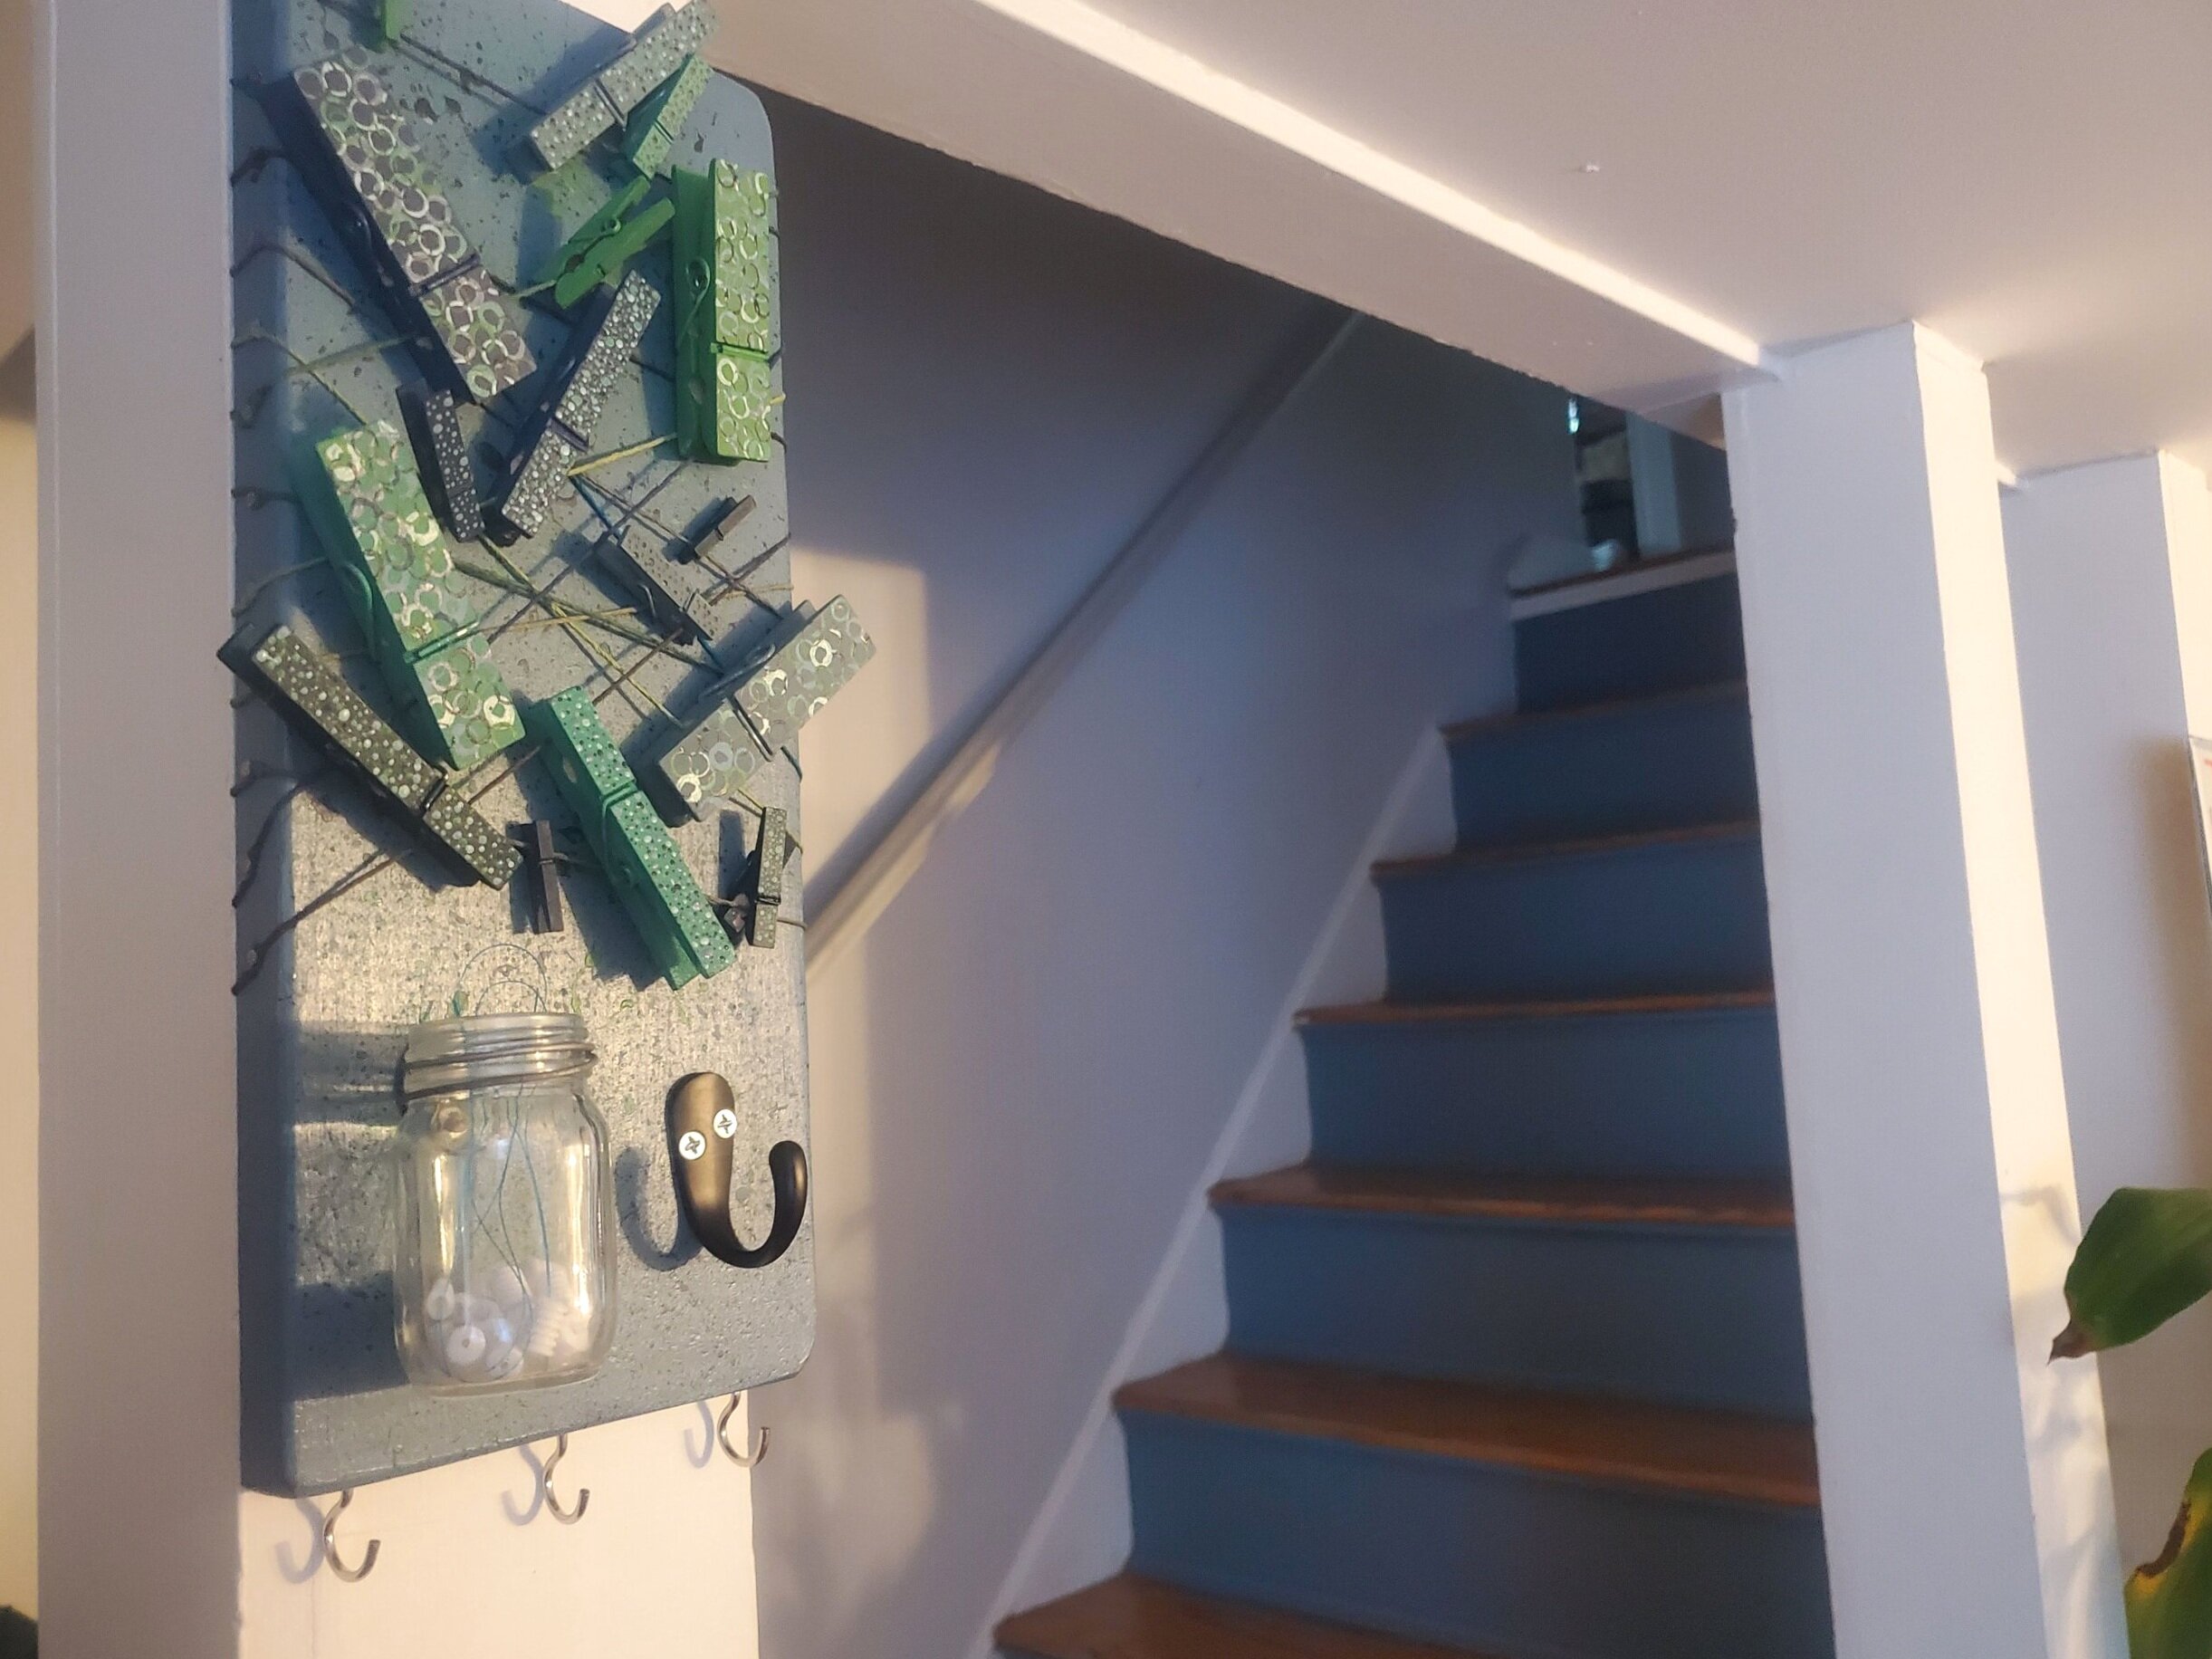
I chose to custom mix my color pallet since I only own a small basic collection of acrylics. Using the same pallet, I splatter painted the base board by running my thumb over a toothbrush. I then did base coats on a variety of sizes of clothespins (I found that using toothpicks as stands was the easiest way to do this). After the closepins had a dry base coat, I made a variety of patterns using straws, brushes, and toothpicks.

20200906_211407.jpg

Once the splatter paint had fully dried on the baseboard, I added nails to the sides, driving them in most of the way but leaving 1/4” or so sticking out and able to tie a string around. I did not bother to measure these out for even spacing as I don’t really care, especially as the string will be tied down in a randomized fashion. But if you are the kind of person who likes to measure, go ahead and do that.

20200817_085618.jpg
20200817_093114.jpg

I had a variety of colors of hemp cord which I chose to use for this. The hemp cord seems seems like the right strength to use for this - i think thread would be too fragile and yarn would likely sag too much under the weight of masks. Any kind of twine would probably also be appropriate for this, and even embroidery thread might work. I tied the cord as tightly as I could around the nail heads before hammering them down over the knots, securing everything. I left tails on the string and taped the extras to the back to give a clean look on the edge. I also attached a picture hanger to the back for ease of hanging.

20200907_152335.jpg

On the original mask holder I attached a variety of hooks to the bottom edge to be used for keys or extra masks, gloves, etc. When I started to work on a mask holder for myself, I decided I wanted to attach a small jar in order to contain the small silicone fasteners I’ve been using to tighten the elastic ear bands on several of my masks. I also added a large hook (maybe for a hat?) that I had laying around as well as a few key hooks underneath. For my friend, I thought the larger hook I had was the perfect spot for a dog leash, so I added an additional jar on hers that perfectly fits a roll of doggie poop bags!

20200923_081437.jpg

These were so simple and fun to make, and something that practically anyone these days could find helpful. Since beginning to use mine in the house, I’ve realized this is really multi-purposed. The clothespins are perfect for quickly storing things like receipts, notes, mail, etc! I’ve already got a few more for friends planned out - maybe playing with dripping paint rather than splattering? Really you can customize this project in infinite ways. Not into painting? - modge podge some patterned paper or fabric to your board and use plain clothespins or whip out your sharpies to add some simple designs!

DIY Board Game

DIY & ProjectsMichela Mastellone-SchottmanComment

I realize this is a strange time to post an idea for a party game, as there should certainly be NO PARTIES in the forseeable future. However, there is continued interest in the game I created and I have had multiple inquiries from people interested in making their own versions. So I figured I would finally get around to posting about my updated version of the game and make available pdf downloads for those who are interested in creating their own version. I also feel like some aspects of this game may lend itself well to a virtual zoom-party type game, so perhaps someone with more time on their hands than I currently have will take some of my ideas and run with it!

If you are one of the few who has been following this blog for awhile, you may recall the fantastic DIY Bachlorette Party Game I created for my best friend's wedding. Since then, there has been high demand in our group of friends to come up with excuses to play. This is by no means a casual game, it is something that you should curate a hilarious group of people to participate and can most certainly make a party on its own. We have now had the oppurtunity several times to play the original game with new groups of people, and while it has always been super fun and a huge success, it has allowed me to think of some key details to change to improve on and make myself my own (second edition) version!

As a first step, I decided to redesign the card deck. I came up with some digital designs for 2 sided cards, making the cards a bit smaller this time around. There are a lot of ways to accomplish designs like this, with a huge scale of technical skill required. A very basic way to do something like this (the technique I used to create the designs for the origial game deck) is to hand draw designs, scan, and then import into the program of your choice to rescale/manipulate to fit your needs. This time around, I simply used the open office drawing program to make designs using free symbols and images available. Gimp is also a great program (very similar to photoshop, but free) for simple digital designs/text art.

card samples.jpg
card samples2.jpg

There is a mixed game deck with 4 categories: Head-To-Head, Would You Rather, Guess Who, and Challenge. There is a separate deck of Penalty cards. For this version, I opted to get rid of the penalty wheel and instead increased the number of cards in the penalty deck and I decreased the number of cards in the game deck, keeping the best of each category, as we never got close to going through them all in a game. I printed the cards double sided on colored cardstock (I used the printer at work so unfortuntely some of the cards are a little out of line). After using a paper cutter to cut out all the cards, I rounded the corners with a paper punch and then laminated them and did a final trim of all the cards. 

20180226_101549.jpg
20180226_133950.jpg
20180226_155234.jpg

I altered the rules only slightly in this new version, mostly adjusting scoring in order to help game play move along a little quicker.

20180227_140404.jpg

As players gain and loose points, they move their pieces around the scoreboard. To create this scoreboard, I made a tri-folding board out of scraps of chipboard (cardboard would have worked fine too). I decided to cut the chipboard to a size that allowed me to utilize an empty shoe box as a game box. I made hinges for the trifolding board using folded piece of thin chipboard and duct tape. I then wrapped the board with a burlap patterened wrapping paper, making sure to carefully fold the board as I pasted the paper down, ensuring that the board would continue to fold well without ripping the paper. 

Each score on the scoreboard has a corresponding rule. The rule must be followed at all times while a player holds that score. Again making an alteration to the original game, I cut the scoreboard down to 20. I printed out my scoreboard scores and rules on cardstock. I mounted the rules on the board boardered by patterened paper and used the cardstock numbers as stencils to cut the scores out of cork. In retrospect, I should have planned better and either printed the rules in smaller text or used a larger board, since it is a bit more crowded than I would like.

20180227_212833.jpg

If it any point a player does not follow their rule, they must draw a card from the penalty deck. These cards range from simply losing a point, to gaining points but needing to follow multiple scorboard rules, to sometimes silly/embarassing (though none too mortifying) penalties such as hula-hooping with an invisible hoop. 

20180228_134753.jpg

I did a test run of this version of the game with a few friends. It does in fact work just fine with 3 people playing, though the pace of the game (and the entertainment factor) definitly benefits from a larger number of players. This game is great for a group anywhere from 4 to about 12 players (so maybe not the best entertainment in this COVID era). Obviously, the more players in the game, the longer the game may run, but higher scores can be attained so players move faster around the board. It's a super fun game to pull out towards the end of a party (often with varied levels of sobriety). One benefit is that players are involved in the game regardless of whose turn it is. The only limitation to the number of players is the number of game pieces, but anything can be used for these. I have a fun collection of plastic animals/monster finger puppets that we've used, but anything small enough to have multiple players on a score will work just fine.

If you would like to try out making a game for yourself, I now have pdf files with the cards, scoreboard and rules available to purchase and download.

DIY Face Masks

DIY & ProjectsMichela Mastellone-SchottmanComment

Unfortunately, ‘tis the global pandemic season when everyone with a sewing machine is cranking out masks and distributing them as widely a possible. I had requests from my own family to make them some masks to help during this time, so I wanted to find a design that featured all the recommended safety precautions as well as one that was a one-size-fits-all design that was relatively comfortable to wear.

DIY face masks.jpg

A word on masks: the CDC recommends that ALL people in the US wear a face mask when out of the house. At this point hopefully everyone is onboard with the effectiveness of wearing masks, but even if somehow you are still skeptical as to the safety feature: there is significant value even in just the social signaling and destigmatizing of masks. If you go into the grocery store and everyone around you is sporting a mask, it signals “Hey! There’s something major going on!” and peaks your awareness and level of caution which is a GOOD THING. But seriously, WEAR A MASK. Most stores rightfully will not allow you to enter without a mask and several cities have impletmented fines for people seen out and unmasked. Masks are here to stay for awhile, so perhaps it’s time to pull out the sewing machine again and make a few more masks to add to your rotation.

There are dozens of tutuorials available online now for a variety of different styles of masks. If you are someone who would like to produce masks to donate to local hospitals (if your local hospital is still in need) - please check first with the place where you would like to donate as many places have very strict guidelines as to what they can accept. I was surprised though as I looked through designs that it was actually somewhat challenging to find a tutorial that gave me simple measurements rather than needing to go through the process of using a template. So I was left to do a little bit of trial and error to find a design and size that worked.

mask cuts.jpg

You will need a single piece of fabric 8”x18” for the mask. Everything I’ve read has suggested using only 100% cotten for this, with the tightest weave you can find. I have plenty of cotton quilting fabric so I used that. Then you will need ties: if you have bias tape, this will save you the time of creating your own, or you could probably use a material that does not fray (like a t-shirt) and use those as ties to avoid needing to sew down the entire length and just attach to the sides of the mask. I settled on making my ties 38” long to allow for a larger range of sizes.

20200410_102221.jpg
20200410_103100.jpg

I first ironed a double folded hem on each short end of the mask. I then inserted a twist tie into each hem and stitched it shut to allow the wearer to squeeze the mask to the bridge of the nose for a tighter fit. In retrospect, an unbent paperclip may have been a better choice, providing even more structure around the nose.

20200410_101945.jpg

Once twist ties were in each end of the mask, I folded the mask in half with the right sides facing out and ironed into several pleats. The finished mask should have a height of only 3.5-4”. This height is important for how closely the mask will fit to your face once tied.

20200410_105414.jpg
20200410_105513.jpg
20200410_105535.jpg

For the ties, I essentially created my own double-fold bias tape (folding into quarters so that raw edges are on the inside). There are many ways to finish the ends; I simply snipped away some of the excess fabric, then folded the ends in to create a square end.

To attach the ties to the mask and finish it all up, simply place the raw edges of the mask into the fold of your ties and sew down the entire length of the tie. The top portion of the ties must be longer in order to comfortably tie around the upper, larger part of a head. The bottom ties are tieing around closer to the neck. About 22” above the mask and 11” below works nicely.

To fit the the mask to your face you should have the downward facing pleats on the outside. I found it easiest to first squeeze the mask to fit my nose and then adjust the mask to the rest of my face.

20200409_105433.jpg
20200409_105327.jpg

You’ll notice this design also leaves the top hem of the mask open, like a pocket. This is so an inner filter layer can be inserted. I highly recommend using this extra layer. I’ve seen many recommendations of materials that can be used. Anything non-woven should work such as: vacuum bag, tissue, coffee filter, or simply 2 layers of papertowels (which I’ve been told is one of the most effective).

I made a handful of these and then washed and packaged them up and sent them on their way to some friends and family. This is such a strange time with so very many big unknowns, it felt nice to know that at least there was one thing I knew I could do that could have a positive effect for someone. Once you are making one mask it really doesn’t take a lot more time to make a few more (and not everyone has a sewing machine or the know-how/time!), so if you’re thinking about tackling this project- make a few extra to send to loved ones or have on hand for someone in need. My few extras have already found homes so I expect I’ll find myself making a new batch soon.

20200411_135707.jpg

Update: I am now tackling a pattern utilizing elastics rather than ties as there are some applications that I’m finding myself preferring the fit of elastic bands rather than ties, and have had some requests for masks that don’t require the hassle of tieing. so stay tuned for an alteration to this design to encorporate elastic!

DIY Livingroom Curtains

DIY & ProjectsMichela Mastellone-SchottmanComment

I'm getting ready to move at the end of the month. It's a little bit bittersweet, as there are many things I love about where I am living now, but there are many positives to the move as well. As much as I hate moving (I've done it a decent amount and I hate it more and more each time), it is always exciting for me to think of new ways to fit my things into a new space. Recently it's making me really appreciate and think more about some of the little projects I've done around the place. I thought I'd share the quick livingroom curtains I made a while ago (and unfortunately did not take photos in progress). Nonetheless, curtains are something so easy that anyone should try.

diy curtains.jpg

Curtains I'm sure are one of the first sewing projects that people feel comfortable tackling. I am a decent sewer, but am far from a perfectionist, so slightly imperfect curtains are a project that pull together VERY quickly and make a big impact on a space. Our little livingroom space really needed to be brightened up a bit, since it easily starts to feel a little cave-like. 

I've gradually done a lot of projects in the livingroom, such as our small storage couch and large futon with covered cushions, which both have a lot of light bare wood keeping the space feel more open. I opted for a cream colored sheet music patterned fabric for the curtains, coordinating well with our light neutral walls and all the bare wood.

20180425_110210.jpg

To add a little pop of color I made fabric loops for hanging the curtain. I started by hemming the two curtains (due to my amount of fabric and the placement of our windows, each window only has one large curtain). I ironed flat the top hanging loops, folding raw edges in, then stitched the loops at the bottom to adjoin them to the top edge of the curtain. 

20180425_110124.jpg

I picked up some 1" dowels to use as curtain rods. I had great plans to make simple wooden hanging brackets to slip the dowels through, but I had a very frustrating afternoon of uncooperative power tools, so I gave up and came up with a cheap and simple solution: metal shelf brackets and zip ties. Now, you are likely classier than I and think this is an unaccepatable look, but I've actually found it to be very subtle and keeps the room feeling open. However, any number of curtain rod solutions could be used. 

A friend recently visiting my place and admiring many of my sewing projects asked me where I find such great fabric. The answer is simple: online. I am someone who HATES going shopping, so I quickly jumped on the rising trend of online shopping. The only trick is that you aren't able to closely match colors (if this is important to you, hit up a local fabric store with a paint chip or other small sample to compare your fabric selection to). If you are picking a fabric online, make sure you pay attention to the TYPE of fabric you are selecting (these curtains are a simple quilting cotton that allows lots of light in but many people prefer a thicker canvas/upholstery fabric for curtains) as well as pay attention to the measurements given with the sample view so you can get a sense for how large the print you are picking out is in reality. My two favorite places to find fabric are Fabric.com and Fabricworm. So do a little browsing, pick out a fabric you love, and tackle some easy DIY curtains to give a room a quick facelift!


DIY Cushion Covers With Piping

DIY & ProjectsMichela Mastellone-SchottmanComment
diy cushion covers.jpg

Couches have been a sore spot of conversation in our house for awhile now. After several frustrating moves and stressful roomate conficts, I ended up with a strage mixed matching of couches that probably belonged at the dump and didnt at all fit our space. I remedied our small livingroom seating through making a small storage couch, but we were left for a long time with our comfortable, but disgusting, large couch as our primary seating and only option for overnight guests. The couch went through many phases of its transformation. On a whim, when we arranged for other bulky items to be picked up as trash, we threw out the frame of our couch, hanging on only to the inner mattress from the pull out couch feature and all of the cushions. I pulled an old futon frame out of storage to be used to support the matress with the cushions placed on top. This was a comfortable solution and easy to cover with some fabric (a necessity to have washable covers with pets in the house) but the fabric would always quickly get tired and start falling out of place. There was a very simple solution: sew cushion covers. I FINALLY got around to doing it, and what a huge difference it has made! 

20170417_200032.jpg
20170503_124150.jpg

To start, I simply measured the existing cushions to figure out the dimensions needed for the covers. There are 3 bottom and 3 back cushions, but I decided to make two long cases, rather than individual cushion covers. This was in part do to my laziness, but also I think helped with the comfort of the couch since the futon frame is longer than the cusions, the covers help keep the cushions tightly squished together and prevent you from wedging yourself into cushion crevices. 

I didn't have enough pattered canvas to make the entirety of the covers, so I used a plain canvas drop cloth as a back to the covers. As a note: canvas drop cloths are a great tool for cheap, sturdy canvas fabric, but it does fray easily, so give yourself extra seam allowance. I decided to simply overlap the back pieces to allow the cushions to slip into, which in retrospect was the wrong choice. The overlap space was very tight to get the cushions into, and a zippered closure would have been a much better choice (though I wouldn't recommend using the dropcloth canvas with a zipper). 

I have never sewn piping on a project before, but thought it would add a nice accent to the cushions and didn't seem too tough after I looked at a few tutorials for piping. I already had clothesline laying around and easily found extra fabric to use for the piping. According to all the tutorials I referenced, fabric for piping should be cut at a 45 degree angle as to allow for the best stretching around the piping/corners of the cushions. I cut 2" strips along the angle and stritched them together to make a long piece of fabric. I wrapped this around the clothesline as I went and stitched it (using a zipper foot so I could get nice and close to the clothesline) to the top pieces of the covers. In theory, this would have been nice to do to the backside as well, giving the cusions a more polished look, but i didn't have enough clothesline on hand and I was enjoying having this be a one-day project.

20180425_105448.jpg
20180425_110435.jpg

Originally I had thought I could sew the piping with a single seam, sandwiched between the top and side pieces, but all the tutorials I looked at for piping suggested sewing the piping first to one layer, and then adding the side pieces on after, with a second seam. Some even suggested sewing the piping first on its own, but that seemed really unnecessary. I did however go ahead and sew the piping to the front pieces before attaching the sides, thinking that perhaps it would be more difficult to sew close to the piping if it were sandwhich between layers.

20180425_105439.jpg

After adding the side pieces, I added the canvas drop cloth pieces overlapping at the back (again, if I were to do this again, I would use a different technique, like a zipper) then flipped the covers right side out and stuffed them with the cusions. A few throw pillows and blankets startegically placed on the futon for maximum lounging comfort and VOILA  a super comfortable seating option that fits much nicer in our space and provides a comfy place for our friends to crash.

Scrap Paper Wall Map

DIY & ProjectsMichela Mastellone-SchottmanComment
maptext.png

This is a project I've had in the back of my mind for a long time. Like so many other projects, it's taken me a while to sit down and take the time to finish up this (very tedious and time consuming) map project. I have a seemingly endless supply of mostly useless small pieces of scrapbook paper. This was an ideal project for using up some of those tiny hoarded scraps. 

I had an old, cheap world map poster that I decided to sacrific in order to use it as a stencil for this project. I repurposed the back board from a broken poster frame that was the same size as my map poster and wrapped it with brown butcher paper as a background for my map. Cardboard or foam board would have worked just as well for this.

20170703_155621.jpg

This entire project was done with no other tools beyond a pencil, glue stick, and exacto knife (I find swivel knives to be the best tool for detailed cutting work). I started by cutting out the continents and then using the map as a stencil to trace the placement of the continents onto the brown background. I left islands attached to the map poster, saving them to add last in order to not loose tiny cut out island pieces.

20180117_200136.jpg

I started the tedious task of cutting out countries individually, tracing the country from the map poster onto a piece of patterened paper, then carefully cutting out the patterened country and gluing it into place on the brown background using a glue stick. In retrospect, it probably would have been a little easier to clump some of the pieces together, such as gluing all countries from a continent onto a separate continenent piece (perhaps using a patterened paper, so very small countries could simply be represented by the background paper peeking through, rather than having to struggle to cut out a tiny shape and place appropriately). The islands were easy to add at the end, once again placing the original cut up wall map on top and using as a stencil. 

20180321_173031.jpg
20180321_173041.jpg

I absolutely love the way this project turned out, and while it certainly took a little while of careful cutting work, it was actually extremely easy. Even easier if you have something like a cricuit or other cutting machine!

map.jpg

DIY storage couch

DIY & ProjectsMichela Mastellone-SchottmanComment

Furniture in my house has been a sore point of conversation for awhile. I had a very upsetting, contentious interaction with a former roommate that resulted in much of my furniture no longer belonging to me and some furniture waiting to be taken to the dump offered to me instead. Needless to say, everytime I glanced in the livingroom and saw our ugly, smelly, out of place couch it made me want to scream. Not to mention that it did not fit the space at ALL and forced us to have a pretty awkward, uncomfortable livingroom layout. 

This couch has been a long process, and come together in many stages. The first thing that needed to get done was to trash the old bulky frame and come up with a new frame design that actually worked for the space. 

I was able to entirely construct this frame from scrap wood from previous projects (mostly leftovers from my storage bed). It's a very simple design. I based the size of the frame off the one nice cushion I had saved from salvaging good parts of a small second hand couch. I decided to add some extra leg stretching room, and added storage, by making an ottoman cube that also allows for different layouts of the couch. The top of the ottoman lifts off to reveal a large empty area for storage, and there is just enough space under the main seating section to fit 4 crates (yay crates!). 

At this point, the couch was functional and we were in desperate need of seating, so it lived for many months awkwardly unfinished with mis-matched blankets and pillows.

I finally got some time to finish up the couch (really I just wanted to make it cuter). I painted all of the trim a nice blue/gray color, I think it's called "denim blue". I decided to use one of my favorite craft materials: contact paper. I used an adhesive cork, but I decided it was too difficult to peel it smoothly off the backing, so instead of using the adhesiveness I used my own spray adhesive to attach the cork (with the backing still on) directly to the wood. I covered the back piece and head board and the bottom section of the ottoman. As an update: all the cork will soon be stripped down and the surfaces instead spray painted with a faux stone textured paint, since my bunny has decided that anything cork must be chewed to bits.

For the cushions, I decided to use a painters drop cloth as fabric. This is a great option for cheap upholstery fabric. I wanted something sturdier than a cotton fabric because we have pets that can be a bit rough with furniture, but upholstery fabric can get pretty expensive. I made simple pillow cases for all of the cushions. My favorite technique for pillow cases is to simply have the case overlap in the back, leaving a large split across the back to fit the pillow in. It does make the case one-sided, but it's so simple and easy to fit cushions in. 

I added an adorable girl on a bike fabric that I've been saving for the perfect project to the back pillows. It matches the colors better than I could have hoped for. I am thinking that in the future if I need to cover up any stains on the bottom cushions I can stencil on some gears or bike wheels. I may also stain or paint the crates in the future, and I've been thinking about adding small hooks to the back for keys, etc. But for now, this couch continues to do a great job at helping make this space feel cozy.

DIY Holiday Decorations

DIY & ProjectsMichela Mastellone-SchottmanComment
diy holiday decorations.jpg

I have never had much of an attachment to holidays. I grew up doing half-hearted celebrations for an eclectic mix of holidays, mostly all as an excuse to enjoy an excellent meal with friends and family. In fact, I generally really dislike Christmas time and the air of capitalism it always seems to bring with it along with lots of uncomfortable social obligations. This year however, I lucked out in avoiding most of the negatives around the holidays and decided to try and do a little embracing of holiday cheer to try and brighten what has been an otherwise very dark, bitterly cold last month or so.

20171221_214139.jpg

I picked up a small indoor Christmas tree, a Norfolk Island Pine, at home depot and some cheap lights and ornaments. I've always liked to decorate Christmas trees sticking with a blue and white theme, as a nod to my Jewish heritage. To add a little more to the house besides my tiny tree, I decided to use some of my scrap paper to make a variety of paper stars to hang from the ceiling. 

I chose to make 3 different varieties, more or less following some decent tutorials I found. I made a bunch of 3D spiral star/snowflakes based off a great post over at Wonderful DIY, I added some cute button accents to finish off oragami stars I made utilising the tutorial I found at Homemade Gifts Made Easy, and I made a handful of 3D stars I found on a craft blog Gathering Beauty, though ultimately found them to look less polished than the others for the amount of effort (and adhesive) required. 

20180104_102610.jpg
star collection.jpg
20171221_180506.jpg

We have also had a small taped christmas tree outline on the wall that has stayed there now for multiple christmases, so I thouhgt I'd use some of the remaining scrap paper to string up some simple 2D star cut outs, just to bring a bit of the festive cheer into the kitchen.

Having extremely low ceilings made tacking up stars a simple task. I had some decorative string lights hanging around unused in a big tangled mess, so pulled those out to string up around the house and bring in a little holiday mood lighting. The tree ended up getting tied down to a crate to prevent our curious kitties from constantly pulling it over and I wrapped a handful of gifts to coordinate with the stars (yes, most of the gifts are for the fur kids). 

stars.jpg
20171221_180452.jpg


Overall, I still think holiday decorating is pretty silly, but I did have fun pulling it all together, and I'm sure the decor will stay up for long enough to help keep a little cozy cheer in the house while we are forced into hibernation with the New England snow for the forseeable future.

DIY Randomized Quilt

DIY & ProjectsMichela Mastellone-Schottman1 Comment

This quilt has been a project I've had on my "to-make" list for a very long time. I've been collecting (NOT hoarding) bits of fabric for a while, and finally had a collection that gave me excessive options for a quilt. I love randomness and asymetery in patterns, so got to work sketching out a design for a queen size quilt. Because I had so many beautiful patterened fabrics, I wanted to have several large areas of the design to allow the fabric to really be showcased.

fabric.jpg

Once I had a design I was happy with, I went through my fabric and assigned different patterns to different quilt patches, using solid patches to break up some of the patterns. All of my patterned fabrics are a nice soft cotton, and I love having a little bit of texture variety on quilts, so my solids are all flannel or jersey material. It was at this planning stage that I measured all my fabric, making sure i had enough for the design, and making adjustments as needed. Once all my measurements were done, I went through and cut out all my rectangular patches, using my design template as a reference. 

Piecing together an abstract quilt design is not simple, and does require some intermediate sewing skills in order to carefully line up seams and avoid gaps in between sections. Really, the rectangles can be pieced together in any order. I chose to try and make slightly larger rectangles first, chosing some of the longer straight seams to tackle first and then piecing things together from the center out, hoping that any slight misalignment would be easier to hide at the end if at the edges, rather than oddly bunching at the center. 

Once the top of my quilt was all assembled, I had to decide on how to turn it into a finished piece. I decided I was most in need of a light-medium weight quilt for my bedroom. I found a queen size cotton blanket to use as my backing and chose to add a little extra warmth to it with a layer of cotton batting in between. I'm always experimenting with how best to finish off the edges of quilts. This time, I chose to utilise the folded over hem of the cotton blanket backing. I simply cut the inner cotton batting to fit snuggly within the frame of the hemmed blanket, wrapped the edge of the quilt top over the batting, and used a decortive zigzag top stitch to attach the layers to the backing. 

This quilt came together so much more smoothly than I was expecting. It definately encouraged me to tackle more sewing projects soon. I've been using the quilt on my bed for a while now, and love having it as a focal point in my room. 

DIY Paper Crane Curtain

DIY & ProjectsMichela Mastellone-SchottmanComment

In every house I've ever lived, I've always had a running list of projects I want to do. I finally had a chance to complete a project that's been on my checklist since I moved in: some sort of window treatment for the back door. I wanted something that provided privacy while still letting plenty of light in and would add some much needed  beauty in the kitchen. I settled on making a hanging curtain of paper cranes.

This was a great project to do - very mindless, methodical and easy to multitask while binge watching a favorite show. After selecting an assortment of scrapbook paper from my seemingly endless supply I cut squares of varying sizes (ranging from about 6x6 -2x2). If this is the first time you've folded cranes, stick to the larger sizes.

With a stack of paper squares in front of me, I recruited my roommate's help to watch movies and overflow a box with a mountain of folded cranes (I'm not sure on the exact number I ended up using - this depends on how large your window is and how densely you want to hang the cranes).


I measured the window and then lay out my cranes. I found it was easier to place them/visualize their spacing if I left their wings folded. In order to hang the cranes, I used small command hooks (they may actually be designed for hanging mugs) and a small dowel over the window. I used different color thread and a needle to string up the cranes, knotting a small bead at the bottom of each to prevent them from sliding down the thread. 


I'm really happy with how this project turned out. I love doing origami, so I'm always super excited when I have an excuse to do it. I love every morning as I make coffee looking out into the yard through what appears to be a flock of flying cranes.

DIY Pallet Planter Fence

DIY & ProjectsMichela Mastellone-Schottman1 Comment

A backyard was a must for me when most recently looking for a home. We lucked out in finding a place with a sizable yard, but unfortunately a few projects needed to get done to make it actually feel like home. While we have a fence between our yard and the adjoining yard of our shared duplex and decent coverage between the yards of our neighbors behind us, our next door neighbors and our yard have no barrier whatsoever, having a few yards run together. I really wanted to have at least some sort of visual barrier between the yards, but was also working with the challenge of being on a rental property, so there were limited options as far as fence installation goes. Luckily, I had a stack of 3 pallets just waiting to be converted into something awesome.

Because of the openness of the yards, I also wanted to be conscious of the fact that the barrier needed to be aesthetically pleasing from our neighbors side view as well. I took a trip to home depot and found a large sheet of plastic trellis. There are LOTS of trellis-type options that can be used for this project. I chose the trellis that I did primarily because of it's affordability, but it was also extremely easy to work with - easy to cut to size with my jigsaw and screw on to the pallet. Out of the one sheet of trellis, I was able to cover the entire back of two vertical pallets, and then decided to use the remainder decoratively with my third pallet. 

After coming up with a game plan, I began dismantling the pallets. I was able to accomplish this with a crowbar and hammer, which didn't leave me too many intact pieces of pallet wood, but it was easy and fun. Some people may prefer using something like a jigsaw to dismantle pallets. I decided to make the planter portion of the pallet 3 slats high, leaving the more open side of the pallet towards our yard so we could see the decorative planter, but also provided a more finished side facing our neighbors. After pulling off any unnecessary pieces, I used my jigsaw to cut down the middle support to the height of the planter, leaving the two side pieces as supports for the trellis back. 

The next step was by far the trickiest: the chicken wire. I got 1/2" wire to insert into the pallet and form the structure of the planter. You could use a different type of wire, but be conscious of what size stones you use then to fill in the bottom of the planter. Alternatively, if you cringe at the idea of having to wrestle sharp metal into a small space, you could skip this step completely and use garden cloth or burlap for the whole interior and forgo the aesthetic of seeing the rocks. If you choose to tackle the wire, I would suggest gloves for sure. I did not do this and still see evidence of that decision.... I used my staple gun to attach the wire, and it was far from graceful - the way my staple gun fit allowed me to primarily attach the wire to the inside of the side pieces and then to awkwardly hammer down misfired staples. I'm sure there are much better, safer, more effective ways to do this. But it worked out for me just fine.

For the third pallet, I decided to make it more decorative rather than a functional planter, so I cut it down horizontally to form a small fence barrier, leaving two longer side pieces on the back to attach the remaining trellis to as a decorative back (in the future I may add wire to the inside of this and fill with decorative rocks). Once all three pallets were modified, I lined them up close to the border of our yard and secured them in place with wooden stakes. For the vertical planters I simply drove stakes into the inside corners of the pallet so the entire thing sits on top of them, securely wedged in and upright. Once the planters are filled they are securely weighed down. I used longer stakes for the horizontal planter and secured the stakes to the back of the pallet with screws. Because we wanted to be able to enclose our yard for convenience with the pets, I spaced the pallets out at distances that allowed me to use panels of a small animal pen to attach between pallets. 

Now the fun part - filling the planter! I decided that rocks were the best option because they helped weigh down the planters and make them sturdy, but also acted as drainage for my plants. Rocks are great- you can buy them cheap in giant bags at home depot, or if you're lucky like me and live on the coast....take a couple trips down the street to the shore and pick your own! I used plain rocks to start filling in the planters, up until I reached the top of the first piece of wood, where you started to be able to see the rocks.

I decided I needed the rocks to be a little prettier, so I washed a bunch, spread them out on a tarp, and got out the spray paint. I added a layer of mixed colored rocks to the planter, up to where I felt left enough room to fill with dirt and plants. I draped burlap into the top half of the planters and filled with potting soil and planted myself a nice little garden including tomatos, basil, parsely, french sorrell, and rosemary! To add something a little visually nicer to my third, horizontal pallet, I used the same spray paint as the stones to make small flower planters out of coffee cans .

DSC_0669.JPG

I re purposed part of a cat tree to place at another spot in the yard and act as an anchor for the pet fence. We are able to completely enclose the yard when we are outside, but then can easily fold up part of it. My plants are all growing really well, though in retrospect I would have made the planters double wide to give them a little extra growing room. So that's on my project for next year!

As the summer has gone on, my plants have thrived. We've been able to enjoy handfuls of delicious cherry tomatoes and I'm constantly grazing on the herbs. I've already started brainstorming ideas for moving my herb garden indoors in the fall!

DIY Stenciled T-Shirts

DIY & ProjectsMichela Mastellone-Schottman1 Comment

I love making t-shirts. They are an easy to customize gift that almost everyone can utilize. If you haven't already, you might like to check out my post on some of the t-shirts I made last year for a wedding. Several important people in my life have summertime birthdays, including my best friend and her step-daughter who have birthdays 1 day apart. I decided on making some quick shirts as gifts, as I had several cute designs in mind.

There are LOTS of ways to decorate a shirt. I decided for these gifts to fall back on one of my favorite techniques: freezer paper stenciling. To begin, I spent an afternoon doodling and editing on my computer to come up with the graphics I wanted on the shirts. For my best friend I drew a very cute "love robot" (an bit of an inside joke between us) which I then scanned into my computer in order to print on freezer paper. I could have just as easily drawn directly on the freezer paper, but I like that this extra step gives me some more room for error. My friend's 12 year old loves spending time with my cat and ferret, so I wanted to make sure that they had some input on her gift. I settled with 2 designs, one cat and one ferret themed. I had seen several cute products available on Etsy and other sources with the phrase "you've cat to be kitten me right meow". It made me laugh out loud, and she's a hilarious kid with a great sense of humor, so I knew she'd love it. I've also seen several cute designs on the market with animal or object outlines integrated into a heart beat. While I have seen a ferret design of these, I was unimpressed by the ferret silhouette used, so instead I just made my own. 

After editing the designs, I printed them to size on freezer paper, carefully cut out, and then used a dry iron on low heat to lightly press the stencils into place on the shirts, wax side of the freezer paper down. I had a variety of left over fabric paints from other projects that I was able to mix up to get a few different colors that I wanted to use. I like to use sponge brushes for applying paint to stencils. 

I let the shirts dry for a full 24 hours before removing the stencils. Everything turned out great! The only minor issue I ran into was that because I chose to make the robot lines so thin, and put the paint on so thick as to make sure the outline really popped, in a few spots the thin, thick painted lines got lifted away from the shirt along with the stencil. This is something that I could have fixed by taking a paint brush or paint pen to the few areas that needed touch-ups, but I actually sort of like the more sketched look of the robot and knew my friend would love it either way, so I decided to leave it as is and will touch it up for her in the future if needed. It's also a good idea to check the instructions on whatever fabric paint you are using. Many paints will recommend after the paint dries, quickly running an iron over the backside to help set the paint. In my experience, this is an unnecessary step, but may ultimately make your design more permanent.

I absolutely love how all these shirts came out and intend to make myself and another friend copies of the ferret heartbeat shirt. Freezer paper stenciling is absolutely still my go-to for quick, easy and GREAT results. If you have a blank shirt laying around, grab some freezer paper at the grocery store and give it a try!


A Golden 28th

DIY & Projects, LifestyleMichela Mastellone-SchottmanComment

I didn't grow up knowing the term "golden birthday" referring to the year in which turn the age of your birthdate. I heard about this excuse for a celebration through a friend in college, luckily in plenty of time for me to help her celebrate her 23rd on the 23rd. I just recently helped my roommate celebrate her 28th on the 28th, and I absolutely expect these friends to reciprocate the fun for me this year when I have my 30th on the 30th. 

It's obvious to most at this point I think that I love any and all opportunities to come up with an excuse to create something - birthdays fall high on that list. I had been mulling over ideas for my roommate's golden birthday for a while. When I pulled together a 23rd golden birthday, I had fun finding 23 different gifts each with 23 items (I believe there were 23 bags each with 23 pieces of candy or paper clips etc). 28 presented a slightly new challenge however. I had a few small gifts I wanted to give my roommate that I knew she needed, but I did not have the budget to buy 28 small gifts. Solution? A SCAVENGER HUNT OF COURSE!

I love scavenger hunts. SO MUCH. So I decided to make 28 item tags, all of which were either tagging small gifts or were coupons for redeemable [free] gifts.

I totally nailed the planning process of the golden birthday party. It did not take me long at all to do all the prep work, and then I was SUPER lucky to have my best friend (a mutual friend of my roommate's and helped me a lot with all of the party planning) able to join me for most of the day to pull everything together. My friend brought along her stepdaughter, so between the 3 of us, we were able to quickly buy balloons and decorations and rush back to the house where we made delicious golden cupcakes and golden sangria and I delegated decorating item tags to a creative child.

Our timing worked out perfectly - we had everything wrapped in golden tissue paper and golden ribbon and tucked away in my bedroom when she got home. Later in the day, at the start of the party, we had everything prepared enough that we simply had my roommate socialize with other guests in her room for 28 minutes while we quickly got all the gifts and tags hidden throughout the house (which is not easy in a small space) complete with  a wall of 28 balloons outside her bedroom door with a "28 Balloons!" tag hanging at eye level to kick off the scavenger hunt. 

Well to say the least, it went well. I knew my roommate would be excited to hunt out all the tags and to discover all of her gifts. And, as expected, a few of the prime gift coupons were promptly redeemed, so we had a 28 minute dance party along with a fun 28-photo photo shoot. I'm so happy with how it all turned out. It was a great gift and party with very little time and money needed - just some creativity!

DIY Ladder Plant Stand

DIY & ProjectsMichela Mastellone-SchottmanComment

I've made a lot of fun additions to our backyard recently. The most impressive is by far the fence I constructed out of pallet planters, but that post is soon to come! Right now I just thought I'd take a second to show off a very simple ladder plant stand to display some flowers. 

I jumped at the opportunity to grab an old wood ladder when I saw it at the dump, as I have a long list of projects in which I could use a ladder. I'm sure in the future I will repurpose it, but for now I threw together bits and pieces I had laying around to make this ladder plant stand! It turns out that on this ladder there are not parallel slats on each side, so I had to cut a piece of scrap wood and wedge it in to support the middle shelf. 

I re-purposed some containers, and rather than drilling drainage holes I opted for layering the bottom with pebbles. In retrospect, I think the plants may have been happier if I drilled a few holes in the bottoms of the planters. Since constructing this, I have removed the middle shelf and relocated that plant. The shelf wasn't as sturdy as I wanted, and while I could have easily screwed in the added support slat rather than just wedging it in, I also felt like the plant wasn't getting an ideal amount of light where it was. I'm thinking I may replace the middle shelf with a more narrow shelf and add some non-flowering decorations. Either way, my cat fully approves of his new favorite sun bathing spot.


DIY Wedding Table Activity

DIY & ProjectsMichela Mastellone-SchottmanComment

A good friend of mine just recently got married and requested that I come up with some sort of table activity to use as place setters. It was a very fun, laid back wedding held in a somewhat rustic-industrial resaurant/bar. It was a small wedding, but there were a good number of children attending, so in addition to the mad libs suggested by my friend, I also created some coloring pages. 

I spent a lot of time on pinterest looking at a variety of wedding activity pages to give me ideas. If you are not interested in doing your own formatting work, there are some great pages out there available to purchase/download from the creators.  I wanted to do some more customization to mine, but had limited time, so I downloaded some free clipart and spent a little time on my computer editing images and formatting my own activity and coloring pages.

I also utilized a few of the wedding mad libs available for download at Something Turquoise. Another friend previously used those mad libs at her wedding and everyone enjoyed them.

ui

The wedding's colors were shades of grey, blue, and purple, so I printed the pages on 8.5x5.5 sheets of cardstock in coordinating shades. I made sure to have enough so that each place could have two pages: an activity page with a coloring page on the back as well as a mad lib with a "fill in the jar" coloring page on the back.

I was happy to find a use for some gray and blue cotton string I had. I tied up packs of two for each place setting.  I had agreed to arrive early at the wedding venue to help set up the space, so I had a fun time arranging the different packs at tables and displaying crayons and rustic wooden twig colored pencils my friend bought for the wedding. 

Not only did the final product turn out great, but the colors matched the other decorations perfectly and provided cheerful place settings. I had fun filling in all the pages with the others at my table as we waited for our delicious dinner, and I think my friend will appreciate some of the drawings her wedding guests drew her for many years to come.

DIY Curtains

DIY & ProjectsMichela Mastellone-SchottmanComment

I've slowly been working through writing about some of the many projects I did after the move. One of the many projects I was quick to get done to pull my room together was making curtains and rods for my bedroom windows. I spent some time looking for fabric and immediately fell in love when I found this geometery fabric. A lot of people I think prefer to use thicker drapery fabric for curtains, or use a liner, but I actually really like how much light these cotton curtains let in. 

I've been sewing since childhood (and frequently it's clear I'm completely self-taught), but I recommend trying out sewing curtains as a beginner. It's a great way to practice sewing straight hems and there's a lot of forgiveness for wobbly stitches. I always like to use a double-fold hem with a zig-zag stitch. For the top edge I simply leave a casing wide enough to easily slide the rod through. I like the look of curtains hanging this way and it's extremely simple to sew, but some people may prefer to add grommets to the top edge after hemming and use curtain rings. 

I decided to make curtain rods out of pvc parts I had to reuse from an old ferret jungle gym. I really like the look of galvanized pipe used in furniture, so I bought a metal finish spray paint for the pvc and hardware. The curtain rods are completely functional, but not nearly as sturdy as if they were real pipes, so I suggest spending the money for real metal piping or other curtain rods if you have pets or kids who are likely to hang off curtains. 


My curtains are slightly more narrow than I would have wanted due to limitations in the amount of fabric I had. But still they suit me just fine and I think add a lot to the room while keeping it light and open feeling. I have since added bits of burlap ribbon as tie backs and love opening up my curtains every morning to watch the birds!

DIY Storage Bed

DIY & ProjectsMichela Mastellone-SchottmanComment

If you've read some of my past posts, you may have seen in my DIY Crate & Pallet Desk post that I moved into a smaller space and I LOVE using crates for functional storage. As part of downsizing my space, I needed to ditch my box spring and my dresser (neither would fit in the moving truck and both were originally aquired from the trash). Once moved into the new place, one of my first projects to complete was to build a bed that could also store all of my clothes (and more).

Oh yeah, and there was one more weird thing I needed my bed to accommodate: my free-roaming ferret. I share my bedroom with my best weasel friend, Xylophone. He is pretty much the greatest thing ever, but there are a few things that need to be customized in a room in order for us to happily share a space. Xylophone has the hilarious habit of hiding shoes. If there is a shoe in the room, he will drag it behind a couch, into a corner, or his favorite: under a bed. Because of this, it was important to me in designing a bed that a ferret could not get underneath to hide things in an unreachable zone. Another "ferret friendly frame" adaptation I decided was important was to make it high enough that Xylo can't climb into bed with me. As much as I love when he crawls into bed to snuggle, I've grown to learn that not everyone appreciates a ferret in the bed....And the final requirement I had for my bed frame was a strange one: a ferret eating station. Among the challenges of having a free roaming ferret is how to keep my fat cat away from the tasty ferret food. Easy solution: a ferret feeding station under the bed with a ferret sized opening!

Building something this big can be very intimidating, but it's actually really straight forward, and I am lucky enough to have access to a wood shop and some professional help with cutting and assembling large pieces of wood. I have a queen sized futon mattress, so I based the size off the matress size, hugging it close in order to minimize the footprint of the bed. As always, crates are my go-to furniture storage option, so I decided to base the bed frame off of 3 basic low cubes, with the bottom shelf sized to perfectly fit wood crates. I decided to make a top shelf to provide additional storage as well as my desired height of the bed. The cubes are all out of 1/2" plywood. Even though my bed is in a corner, the structure of the frame is identical on each side so that in future homes I have the flexibility to position my bed to access storage on all sides.

I made the two side support "cubes" a bit deeper than the depth of a crate. This allows for there to be more support towards the middle of the bed, as well as some additional storage behind the crates (it is also a fun play space for small pets). The end cube is significantly less deep, and I chose to store crates going in width wise. At the end of the foot cube, I cut out a window and inserted a piece of perforated metal leftover from a past project (any sort of wire mesh or material with openings smaller than a kitty paw would work for this) in order to prevent Xylophone from feeling like he was eating in an actual cave, and to give a little airflow to the area. On the open side of the end cube on that corner, I added a small covered corner with a ferret sized hole that allows me to hide a bowl of food in the back corner before sliding in the neighboring crate.

I added a back piece of plywood to add stability at the head end between the side cubes. In order to support the mattress on top of the cube frame, I added two pieces of 3/4" plywood attached to 1x4's to form an edge that slightly overhangs the cubes and hugs the mattress. The two pieces of plywood forming the bed platform are joined in the middle (underneath) for maximum stability. I finished off the frame by adding a final piece of 1x4 to edge the foot cube. 


Before assembling, I painted all visible areas of the frame with a nice grey/teal color (I believe the formal name is "sophisticated teal") and I stained the crates with a variety of leftover stains, even making a teal stain by watering down the paint I used for the frame. I took a little time to find some storage containers that I liked for the top shelf, and I have plans to make a headboard in the future, but for now my DIY storage bed is working perfectly in my space!

Magic of Contact Paper

DIY & ProjectsMichela Mastellone-SchottmanComment

I'm in the process of writing up some great DIY posts about some fun home projects I recently finished, but for now I thought I'd write a quick post about one of my favorite home crafting materials: contact paper (or adhesive vinyl if you're looking to be more accurate).

I like to use this magic material for everything possible. You can now buy a huge variety of patterns and even textures, especially if you begin to explore the world of adhesive wall papers. I love how easy to clean the smooth finish is and it is so affordable and easy to use, with fantastic results. 

I generally choose to work with adhesive rolls, but have also made use of some nice patterned non-adhesive types for things like placemats, an easy to clean mat under litterboxes, or as floor coverings in reptile tanks. 

Most recently, I've used some nice patterned contact paper for covering an old steamer trunk, constructing a small pet gate, and covering a piece of plywood to be used as a desk. I have plans to soon utilize a few rolls of adhesive cork to finish off a couch I made.


Let me know if you've used contact paper to create anything, or pick up a roll and give it a try! 

DIY Crate & Pallet Desk

DIY & ProjectsMichela Mastellone-SchottmanComment
diy crate pallet desk.jpg

Over the past decade, I have moved a LOT. In the process of moving, you quickly learn that furniture is mostly more trouble than its worth and cardboard boxes are seriously lacking in their ability to handle moving large numbers of books. Solution? Crates! Much of my furniture is created primarily of crates - they are cheap, sturdy, easy to paint or stain, and when it's time to move again, most of my packing is already done!

During the process of my most recent move (NC to ME), I knew I needed to rethink much of my furniture and storage as I was prepping to move into a much more compact space. I was lucky to have my future roommate able to measure my room before I moved, so I knew that my previous crate & door desk would not fit the space. I love using crates for the front supports of a desk. It provides plenty of storage for notebooks and other office supplies. One of my favorite crates has three small drawers in it. I'm pretty sure I found it many years ago at a craft store, but it would not be too difficult to make something similar to this for yourself, maybe using small baskets for drawers. I also like that stacked crates provide a relatively tall desk, which is my preference. I also already had two 4x4 posts cut to the same height as the stacked crates being used as back supports for the desk. Because I wanted to reuse as much as possible, I simply started a hunt for something to use as a top to my desk that would fit my new space.

DSC_0262.JPG

Soon after reliezing I needed something to replace the large door top of my desk, I stumbled upon a pallet in relatively good condition with a thin piece of plywood the same size. Several weeks later, I passed by a desk discarded by a dumpster. It wasn't a particularly nice desk - but it did have two large wooden drawers that looked to be pretty close in width to the openings in a pallet. I grabbed them both and brought them home to try out with my pallet and they fit almost perfectly!

After a successful move, all I had to do was re-purpose some of those crates into my new desk! I attached the back posts to the pallet with brackets, but I let the front end rest unattached to the crates. I ended up attaching some cardboard to the bottom of the pallet, just to provide a flat surface to rest on the crate supports, and to prevent the drawers from falling through the pallet. A thin piece of plywood is probably a better solution, but I didn't have that available, and cardboard is working perfectly. 

DSC_0586.JPG

I bought a roll of a wood pattered adhesive to cover the top piece of plywood. There are a huge number of patterned contact papers and adhesive wall paper available which I love utilizing in different projects. It's a great finish for very little work and money. I ended up deciding to finish off the exposed edge of the pallet with a thin piece of poplar. This was unnecessary, but that edge of the desk faces my bed and I did not like the aesthetics of looking into the open pallet and drawers. 

The height of the pallet added on top of the crates make the desk quite high, but I use my desk mostly for crafting so appreciate having a standing desk or something that is comfortable to sit at with a stool. The giant drawers provide plenty of room to organize (or throw into a big pile) all of my scrap paper. I originally thought about placing a small bar inside the pallet at the back of the drawer to prevent it from being pushed in too far, but I have not had any issues with that. I couldn't be happier with my trash desk!

DSC_0578.JPG

DIY Camera Strap

DIY & ProjectsMichela Mastellone-SchottmanComment

 I have a Nikon D60 that I LOVE. I have a generic Nikon camera strap that I do not love. I've found dozens of adorable strap options for sale, and they are common on etsy and craft venues, but I decided I'd rather save the money and have a little fun customizing one for myself! 


I decided that I would put cameras on my camera strap....that seems appropriate, right? If you prefer, at this step you can use any fabric that you wish for your strap, I just didn't have any that I liked, so I made my own! I spent some time sketching basic camera outlines. I then scanned the drawings in order to resize and format them on my computer (I do this for most of my projects - I prefer drawing by hand, but love having the ability to manipulate designs to fit for different uses). I decided how long to make the fabric portion of the strap and formatted a pattern of cameras to be printed on a chartreuse cotton fabric I had leftover from past projects. I used my favorite technique of backing fabric with freezer paper in order to run it carefully through my inkjet printer. In retrospect, this would have been a good project to do some sort of pre-treating of my fabric in order to waterproof somewhat, or to have used a different fabric printing technique. Over time, some of my cameras have become a little smudged due to my tendency to take pictures in the rain or while forging through a river.


Once printed, I set aside that piece of fabric to concentrate on creating the structural part of the strap. In order to attach the fabric portion of the strap to the body of the camera, I decided to mimic the design of my old nikon strap which uses 1/2" webbing, which is then locked with a plastic piece (which I recycled from that old strap). Unfortuantely, in all my mountains of craft supplies, I didn't have any 1/2" webbing. So I divided a piece of 1" nylon webbing and melted the raw edge with a lighter to prevent fraying.

I wanted the fabric portion of the strap to have some bulk to it to provide a nice grip and some security to my camera. For this I used a piece of a canvas dropcloth cut wide enough to fold over twice (remember to fold the raw edges in!) I then carefully positioned the webbing into the ends of the cloth strap and ran two rows of stitching through the center of the four layers of canvas and firmly attaching the webbing to the fabric portion of the strap - an important step in securing the safety of my camera. I ran an additional 2 rows of stitching parralell to the center ones in order to stiffen the canvas, and I liked the look visually on the cavas of the additional seams. 

In the final steps, I attached the printed camera fabric to the canvas strap by turning the raw edges under and doing a simple top stitch along the edge of the printed fabric. I added some dark gray fabric to finish off the fabric strap. I copied the shape and stitching pattern of my original Nikon strap. This step is unnecessary to the structure of the strap, although it does make me feel better to have the additional stitching attaching the webbing to the strap. These end pieces could be made out of a variety of different materials - or you could think of a different way entirely to attach your camera/webbing to your strap, but I know I feel confident letting my camera dangle from my arm on this!